Reactのチュートリアルを一通りやり終えたので、Angularでやったらどうなるか試してみた。
ついでなのでStackBlitzを使ってみることにした。StackBlitzについてはこちら
プロジェクト作成
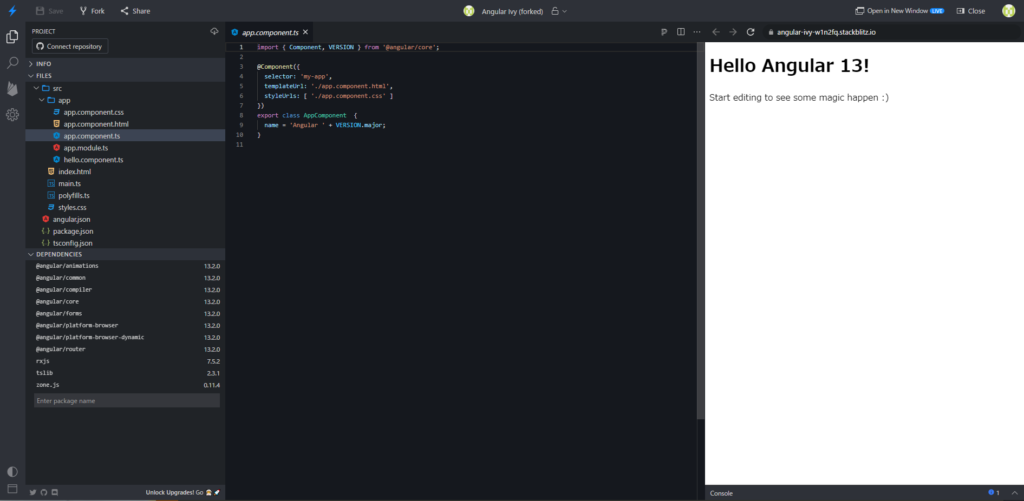
- ダッシュボードにてAngularのアイコンをクリックするとプロジェクトが作成される。
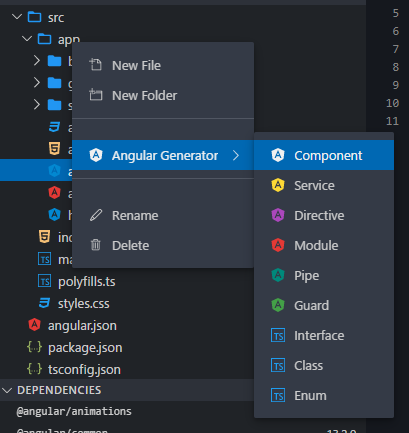
- appフォルダ上で右クリック→”Angular Generator”→”Component”を選択する。
- 上部にコンポーネント名を入力すると、コンポーネントが作成されるので、以下のコンポーネントを作成する。
- game
- board
- square


- app.module.ts に作成したコンポーネントを追加する
import { NgModule } from '@angular/core';
import { BrowserModule } from '@angular/platform-browser';
import { FormsModule } from '@angular/forms';

import { AppComponent } from './app.component';
import { HelloComponent } from './hello.component';
// ↓ 追加
import { BoardComponent } from './board/board.component';
import { GameComponent } from './game/game.component';
import { SquareComponent } from './square/square.component';
// ↑ 追加

@NgModule({
  imports: [BrowserModule, FormsModule],
  declarations: [
    AppComponent,
    HelloComponent,
// ↓ 追加
    BoardComponent,
    GameComponent,
    SquareComponent,
// ↑ 追加
  ],
  bootstrap: [AppComponent],
})
export class AppModule {}- htmlにそれぞれのコンポーネントを表示できるように記述する。
<app-game></app-game><p>game</p>
<app-board></app-board><p>board</p>
<app-square></app-square><p>square</p>squareコンポーネント
squareコンポーネントは、valueを親コンポーネントからもらって、クリックしたらイベントを親コンポーネントに返す。
Reactではpropsで行なっていたが、Angularでは@Input、@Outputを使用する。
  @Output() clicked = new EventEmitter<number>();

・・・

    this.clicked.emit();
子コンポーネント側で@Output() と宣言した変数は、親コンポーネントで使えるイベントとなる。
emitされた値を親側で受け取ることができる。
import { Component, EventEmitter, Input, OnInit, Output } from '@angular/core'; // 変更

@Component({
  selector: 'app-square',
  templateUrl: './square.component.html',
  styleUrls: ['./square.component.css'],
})
export class SquareComponent implements OnInit {
  @Input() value: string; // 追加
  @Output() clicked = new EventEmitter<number>(); // 追加

  constructor() {}

  ngOnInit() {}

  // ↓ 追加
  buttonClick() {
    this.clicked.emit();
  }
  // ↑ 追加
}
<!-- ↓ 変更-->
<button [className]="'square'" (click)="buttonClick()">
{{ value }}
</button>
<!-- ↑ 変更-->.square {
background: #fff;
border: 1px solid #999;
float: left;
font-size: 24px;
font-weight: bold;
line-height: 34px;
height: 34px;
margin-right: -1px;
margin-top: -1px;
padding: 0;
text-align: center;
width: 34px;
}
.square:focus {
outline: none;
}
.kbd-navigation .square:focus {
background: #ddd;
}boardコンポーネント
boardコンポーネントも親コンポーネントからsquare(9マス分のvalue)を受け取り、squareコンポーネントのクリックイベントを親コンポーネントに返す。
- squareコンポーネントの@Input, @Outputに合わせて変更する。
<!-- ↓ 変更-->
<div [className]="'board-row'">
  <app-square [value]="" (clicked)="onClicked(0)"></app-square>
</div>
<!-- ↑ 変更-->- gameコンポーネントとやり取りするための記述をする。
import { Component, EventEmitter, Input, OnInit, Output } from '@angular/core'; // 変更

@Component({
  selector: 'app-board',
  templateUrl: './board.component.html',
  styleUrls: ['./board.component.css'],
})
export class BoardComponent implements OnInit {
  @Input() squares: string[]; // 追加
  @Output() clicked = new EventEmitter<number>(); // 追加

  constructor() {}

  ngOnInit() {}
  // ↓ 追加
  onClicked(event: number) {
    this.clicked.emit(event);
  }
  // ↑ 追加
}- 9マス分用意する。
<div *ngFor="let i of [0, 1, 2]" [className]="'board-row'">
  <app-square
    *ngFor="let j of [0, 1, 2]"
    [value]=""
    (clicked)="onClicked(3 * i + j)"
  ></app-square>
</div>
valueはgameコンポーネントを修正後に修正。
gameコンポーネント
boardコンポーネントに9マス分のvalueを配列にして引き渡し、クリックイベントを受け取る。
- boardコンポーネントの@Input、@Outputに合わせて変更する。タイムトラベル用の記述も併せて行う。
import { Component, OnInit } from '@angular/core';

type squareType = {
  squares: string[];
};

@Component({
  selector: 'app-game',
  templateUrl: './game.component.html',
  styleUrls: ['./game.component.css'],
})
export class GameComponent implements OnInit {
  history: squareType[] = [{ squares: Array(9).fill(null) }];
  status: string = '';
  stepNumber: number = 0;
  xIsNext: boolean = true;

  constructor() {}

  ngOnInit() {}
  jumpTo(num: number) {
    this.stepNumber = num;
    this.xIsNext = num % 2 === 0;
  }
  onClicked(event: number) {}
  trackFn(index: any, move: squareType) {
    return index;
  }
}
<div [className]="'game'">
<div [className]="'game-board'">
<app-board
[squares]="history[stepNumber].squares"
(clicked)="onClicked($event)"
></app-board>
</div>
<div [className]="'game-info'">
<div [className]="'status'">{{ status }}</div>
<ol>
<li *ngFor="let step of history; index as move; trackBy: trackFn">
<button *ngIf="move === 0" (click)="jumpTo(move)">
Go to game start
</button>
<button *ngIf="move !== 0" (click)="jumpTo(move)">
Go to move #{{ move }}
</button>
</li>
</ol>
</div>
</div>ol,
ul {
padding-left: 30px;
}
.status {
margin-bottom: 10px;
}
.game {
display: flex;
flex-direction: row;
}
.game-info {
margin-left: 20px;
}- ngOnInit()で、statusの初期値を設定する。
  ngOnInit() {
    this.status = 'Next player: ' + (this.xIsNext ? 'X' : 'O');
}- calculateWinner()を実装する。
  private calculateWinner(squares: string[]) {
    const lines = [
      [0, 1, 2],
      [3, 4, 5],
      [6, 7, 8],
      [0, 3, 6],
      [1, 4, 7],
      [2, 5, 8],
      [0, 4, 8],
      [2, 4, 6],
    ];
    for (let i = 0; i < lines.length; i++) {
      const [a, b, c] = lines[i];
      if (
        squares[a] &&
        squares[a] === squares[b] &&
        squares[a] === squares[c]
      ) {
        return squares[a];
      }
    }
    return null;
}- onClicked()を実装する。
    const his = this.history.slice(0, this.stepNumber + 1);
    const sq = his[his.length - 1].squares.slice();
    if (this.calculateWinner(sq) || sq[event]) {
      return;
    }
    sq[event] = this.xIsNext ? 'X' : 'O';
    this.history = this.history.concat([{ squares: sq }]);
    this.stepNumber = this.history.length - 1;;

    const winner = this.calculateWinner(this.history[this.stepNumber].squares);

    if (winner) {
      this.status = 'Winner: ' + winner;
    } else {
      this.xIsNext = !this.xIsNext;
      this.status = 'Next player: ' + (this.xIsNext ? 'X' : 'O');
    }
boardコンポーネント 再び
gameコンポーネントから受け取ったsquaresを使用して、値をsquareコンポーネントに引き渡す。
<div *ngFor="let i of [0, 1, 2]" [className]="'board-row'">
  <app-square
    *ngFor="let j of [0, 1, 2]"
    [value]="squares[3 * i + j]" // 変更
    (clicked)="onClicked(3 * i + j)"
  ></app-square>
</div>
完成!


コメント